

How To Install Commercial Tile
How to Lay a Vinyl Tile Floor (VCT flooring)
You can lay a good-looking vinyl tile floor in a weekend.

If you're skilful at measuring and are comfortable using a utility knife, y'all'll have no problem installing a basic vinyl composition tile (VCT) floor.
You lot might also like: TBD
- Time
- Complexity
- Cost
- Multiple Days
- Intermediate
- $101–250
Programme ahead for VCT flooring
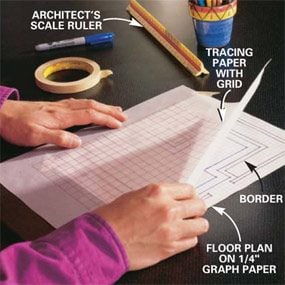
Photo 1: Draw a scale plan
Draw a calibration plan (1 ft. equals 1/ii in.) of your kitchen on graph paper and add the border. Depict a grid of1/two-in. squares on tracing paper. Shift the tracing newspaper effectually on top of the plan to meet how varying the layout affects the width of the partial tiles along the border.
What is VCT Tile?
At beginning glance, this floor might not wait similar information technology's made of the aforementioned blazon of vinyl tile that yous may remember from your parents' rec room. Only like bong-bottoms and miniskirts, vinyl tile is back. It'due south inexpensive, nigh indestructible and easier to install than almost other flooring materials. The best function is the space number of designs yous can create once you larn a few special techniques. In this article, we'll become beyond basic flooring laying to prove you how to programme and install a decorative edge and how to insert custom shapes into the floor tile. If you're good at measuring and are comfortable using a utility pocketknife, you'll have no problem installing a bones vinyl composition tile (VCT) flooring. Our design incorporates circles, but cutting and installing the circles isn't for everybody. It requires patience, attention to detail and a stiff, steady paw. Expect to spend about a mean solar day preparing the floor, and then a few more days laying the tile, especially if you're installing a flooring like ours with borders and custom-cut decorative tiles. You can install a simpler floor without a border or custom tile using the techniques nosotros'll show y'all and be done in virtually a day.
Don't settle for what's on the shelf—special-gild the colors y'all want The vinyl composition tile (or VCT flooring) we're using costs about 60¢ to 90¢ per foursquare human foot. The almost common size is 12 in. square and 1/eight in. thick. Although it'due south relatively easy to cut with nothing more than a straightedge and sharp utility knife, nosotros'll exist using a special VCT flooring cutter for speed and precision. You'll find a few basic colors of VCT flooring in stock and tin can special-order others. Unlike other modern flooring fabric, VCT flooring does have to be polished to maintain a shine.
A scale plan makes custom floor design easy Before yous showtime shopping for tile, measure out the room and draw a calibration plan on ane/iv-in. graph newspaper (Photograph 1). Your goal is to make the cut tiles along the border (or wall if yous won't be installing a border) as large every bit possible. If you get stuck with skinny tiles, place them along an inconspicuous wall. When you lot find an organisation you like, transfer the floor plan from the graph paper to a tracing paper grid and make a few photocopies. At present utilize colored pencils to experiment with different color combinations. Later you complete the floor plan, count the number of tiles. Order your tile, calculation xv percent for waste product. You lot'll probably accept to order full cartons (well-nigh 45 sq. ft. per carton) of each color. Wait to wait a week or ii for the tile to get in. In addition to tile, y'all'll need latex agglutinative specifically for VCT flooring; check the characterization to be sure. This calorie-free-colored adhesive spreads easily, has no dangerous solvent fumes and cleans up with water while it's wet. I gallon covers well-nigh 200 sq. ft. and costs $15 to $20.You'll besides demand transition strips at doorways and openings into other rooms and forest base shoe molding to encompass the edge of the tile along walls and cabinets.
Careful floor prep is the key to a smooth floor
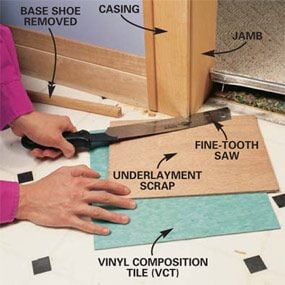
Photograph 2: Fix door casings and jambs
Saw off the lesser of door casings and jambs to allow room for the underlayment and tile to slide under. Cease tight cuts with a utility knife and sharp chisel.

Photograph 3: Install underlayment
Spike a layer of i/iv-in. plywood underlayment to the onetime floor with 7/eight-in. narrow crown staples using a rented pneumatic stapler. Place staples 4 in. apart in the center of the canvass and two in. autonomously along seams and edges. Stagger the seams, laying full sheets if possible.
Fifty-fifty these 1/eight-in. thick vinyl tiles won't encompass up bumpy floors. Concrete must be structurally audio and dry out with no large cracks or uneven sections. Scrape or chip off bumps and fill low spots with floor-leveling compound. A layer of underlayment (lauan or other special plywood, $12 to $20 per 4 x 8-ft. sheet) should be installed over wood floors to create a smoothen, make clean surface for the tile. Underlayment is available at home centers and lumberyards.
Remove base shoe moldings, door thresholds and metal carpet strips, then undercut the door casings (Photo 2). Let the underlayment to acclimatize to the humidity in your business firm for a day or two. Then cutting information technology and staple it downwardly (Photograph 3). You'll demand nigh sixteen staples per square human foot, and then rent a compressor and a pneumatic stapler that drives narrow crown (ane/4- or iii/16-in.) x7/eight-in. long staples for large floors (Photo 3). Again, a smooth, make clean surface is essential. Level uneven seams in the underlayment by filling the low side with floor filler (available at dwelling centers and flooring retailers).
Caution!
Many old vinyl floors and the adhesive used to install them incorporate asbestos. Because asbestos tin exist hazardous when it's disturbed, it's improve to embrace onetime vinyl floors with a layer of underlayment than to tear them out.
Gluing downwardly the VCT flooring tile
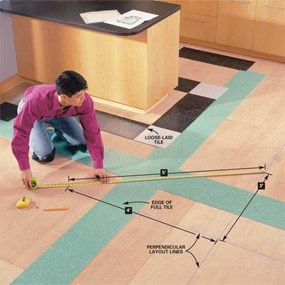
Photo four: Loose-lay the tile
Loose-lay tile to check the size of cut pieces. Snap a chalk line across the center of the room, parallel to the most prominent wall and aligned with the border of a tile. Use the 3-4-5 triangle method shown to snap a line perpendicular to the first, also aligned with the edge of a tile. Darken the lines with a straightedge and pencil.

Photo 5: Measure out for the edge
Measure from the perpendicular layout lines to marker the verbal location of the edge. Snap chalk lines for the border and darken them with a pencil.
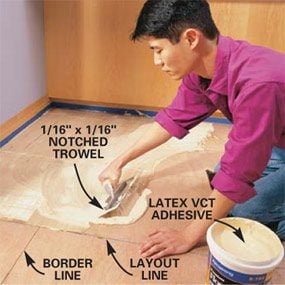
Photo half-dozen: Utilize the adhesive
Spread a thin, fifty-fifty layer of VCT floor agglutinative with a i/16-in. x 1/16-in. notched trowel. Spread gum over half the floor, starting at the wall and working upward to the center layout line. Allow the glue to dry out until it's clear and tacky.
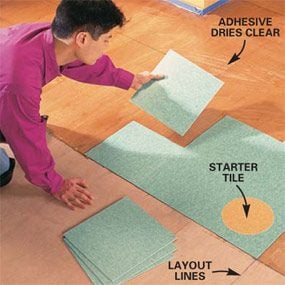
Photo vii: Install total tiles
Press the full tiles into place along the perpendicular layout lines, starting with the first tile at the intersection. Proceed in a stair-pace way to go along the tiles aligned. Meet Photos 12 – 14 for instructions on how to make special decorative tiles.

Photograph eight: Cut tile to fit
Notch tile to fit around border corners. Mark the width of each cut needed to grade the notch. Warm the tile virtually ane infinitesimal with a oestrus gun until it's pliable. Then cut the tile using a utility knife and steel straightedge.
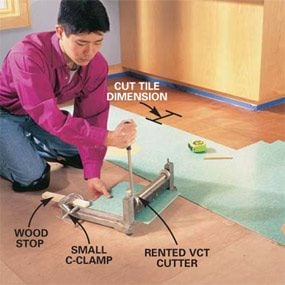
Photo ix: Cut partial tiles
Cut partial tile to butt up against the penciled border line. Attach a terminate to your VCT flooring cutter and cut plenty tiles to complete the entire row. Printing the cutting tiles into place.
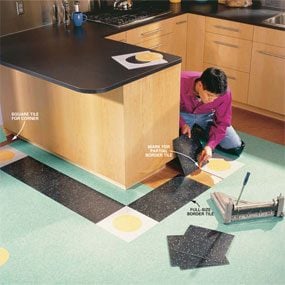
Photo 10: Lay the border
Lay the edge starting with total tile. Marker and cut fractional tile to complete each section. Continue to measure and cut tiles to fill the space between the black edge and the walls and cabinets.

Photo 11: Install rug strip
Boom a wrap-down metal carpeting strip over the tile at doorways to carpeted rooms. Push button the carpet to the dorsum of the strip with a putty knife and trim it flush with a sharp utility knife. Use a hammer and block of woods to bend the metal downwardly and pinch the rug.
The glue we utilise allows hours of working time With the layout lines marked in pencil, you're set to roll. Sweep the floor carefully; even a tiny chunk of dirt will eventually bear witness through the tile. And so pour a mound of agglutinative on the floor and spread information technology (Photo six), starting at the uttermost corner and working upward to the lines. Keep a wet rag handy for wiping your hands and cleaning up excess mucilage. Dried glue can only be removed with mineral spirits or special adhesive remover.
Once the adhesive dries and turns clear, you'll take at least half-dozen hours to lay tile—plenty of time to finish tiling the first half of your floor, including the cutting.
The special VCT flooring cutter simplifies the piecework You lot'll be able to encounter the layout lines through the dried agglutinative. Place tiles carefully, because subsequently they're pressed into the adhesive, they're very difficult to remove or reposition. Using the stair-step technique (Photo vii) will help y'all go on the tile edges precisely aligned and tightly butted together. Refer to your plan for placement of special decorative tiles—in our case, circles. You'll notice a "grain" pattern in the tile. Some installers turn every other tile 90 degrees for a checkerboard effect. We chose to keep the grain running in the same direction. To meet which look you prefer, experiment by loose-laying some tile on a dry floor. Lay all of the full tile. Then measure and cut the partial tiles needed to fill out to the border line. You may have to notch a tile for an inside or outside corner or to cut around a cabinet. Photograph eight shows how. Rent a VCT floor cutter ($13 per day) to ensure precise, clean cuts (Photo 9). If your rental store doesn't take a VCT flooring cutter, you lot can cut tile on a table saw fitted with a sharp carbide finish blade (wear a dust mask, safety spectacles and hearing protection). Another option is to score forth a straightedge with a precipitous utility pocketknife and break the tile along the scored line. Clean upward rough edges with a file or lx-grit sandpaper.
Complete the field tile, then lay the border. Don't worry if the joints betwixt the border tiles don't line upwards with the joints in the field tile. Showtime by laying full tiles at the corners. Then cutting the final tile in each section to fit (Photo x). If by bad luck the last tile is going to be less than 1 in. wide, cut an inch off the previous tile to make the terminal 1 larger. Complete the flooring past filling in the tiles betwixt the blackness border and the wall (Photo 10). Cutting these tiles so the joints marshal with those of the border tile. You'll end up with a squeamish-looking square tile at within corners, but yous might accept to notch a tile to become effectually an exterior corner.
CAUTION!
Keep your hand and fingers out of the path of the utility knife, and wear heavy leather gloves for protection.
Create your own custom tiles

Photograph 12: Prepare tile for cutting circles
Draw a circumvolve on the face of a tile with a compass. (Apply a few layers of masking tape to protect the tile at the pivot point; see Photo 13). Heat the tile from the backside with a heat gun set on "high.' Keep the tile moving over the oestrus source until information technology'south flexible (almost 60 seconds). Wear leather gloves to protect your hands from burns.
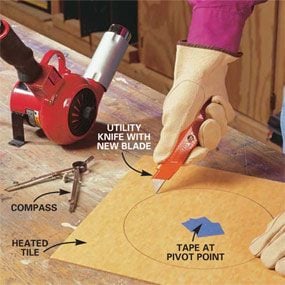
Photograph 13: Cutting a circle from the hot tile
Cutting a circle from the hot tile by deeply scoring the line with a utility knife. BEND the tile (reheat if necessary) and skin the cutout shape from the surrounding tile. Polish the crude edge of the circumvolve with 60-dust sandpaper, beveling it slightly to the back side.
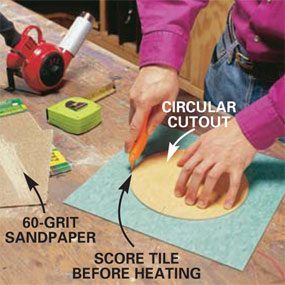
Photo fourteen: Utilize the circle equally a pattern
Use the cutout circumvolve as a pattern to cutting a hole in the 2d tile. Hold the circle tight to the second tile and accurately score a line effectually the perimeter with a utility knife. Heat the tile and deepen the scored line with the utility knife. Reheat the tile if necessary and flex it to remove the cutout section. Polish whatsoever ragged edges with a utility knife and printing the first circle into the pigsty.
Photos 12 – 14 show how to create custom tiles. But don't expect perfect results without a fiddling practice. You don't have to make circles. Apply the same procedure to brand any shape you can imagine.
Purchase special accessories to simplify transitions
There are many ways to make transitions to other types of floor. But the best way is to apply special reducers designed for each situation. Photograph 11 shows a professional person method for finishing a raw carpeting edge. Ask your floor retailer to recommend transition pieces for your flooring.
Routine cleaning and care will aid your floor last decades
Clean excess mucilage from the face of tiles with a damp rag or mineral spirits. So rent a 100-lb. floor roller ($thirteen a day) and roll the flooring to ensure a tight bond between the tile and agglutinative. Reinstall your old base of operations shoe moldings or cut and install new ones.
Allow four or five days for the adhesive to fully cure earlier washing and sealing the floor. To fix it for sealing, sweep the floor and clean it with a mild neutral detergent like Armstrong S-485 Floor Cleaner. Use a non-abrasive scrub pad to remove stubborn marks. Allow the flooring to dry before applying several coats of high-quality acrylic floor polish or sealer.
Required Tools for this Project
Have the necessary tools for this DIY project lined upwardly earlier you start—yous'll relieve time and frustration.
Heat gun, VCT flooring cutter (rent for $13 a twenty-four hours), compressor and narrow crown pneumatic stapler, 100-lb. flooring roller (rent for $13 a twenty-four hour period), Fine-tooth saw
Required Materials for this Projection
Avoid concluding-minute shopping trips by having all your materials ready ahead of time. Hither'due south a listing.

Source: https://www.familyhandyman.com/project/how-to-lay-a-vinyl-tile-floor/
Posted by: mathersvengland.blogspot.com
0 Response to "How To Install Commercial Tile"
Post a Comment